Advanced Mario Sequencer
The Advanced Mario Sequencer is a remake of the sequencer feature from the old SNES game Mario Paint. It was inspired by the Mario Paint Composer, but aims to provide a more user-friendly GUI with added and enhanced editing features.
I wrote the AMS a long time ago in RealBasic. Since I have no access to the compiler anymore, I can’t update it with 64bit support, making the macOS version useless on recent OS versions. The Windows version is still working.
Downloads
Manual
Introduction
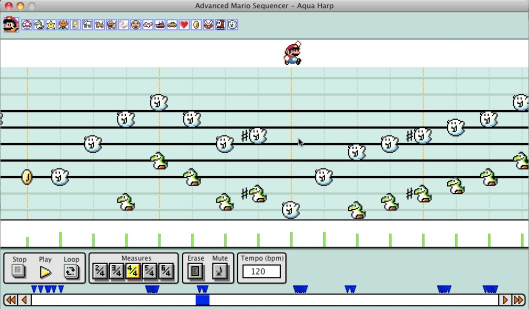
The Advanced Mario Sequencer (AMS) is a reimplementation of the sequencer module of the SNES game Mario Paint. I created it after seeing the limitations of the Mario Paint Composer, another remake done by unFun Games. Its purpose is to create nice and wicked music pieces with samples of the original Mario Paint sequencer, or other samples from SoundFonts you can include yourself. The song will be played by Mario hopping on the chords.
Basics
So let’s get started making some music! You can choose your instrument from the ones shown at the top of the main window. Each one plays its sound when you click on it. The currently chosen instrument appears bigger than the others.
When your instrument is chosen, click anywhere in the editing area to set a note of it there. You can set multiple instruments at the same position if you want. The possible note range goes from the low A to the high C. You can also apply sharps and flats to a note - just hold the Shift or Ctrl button on your keyboard while setting the note. The sharp or flat only applies to the note of the instrument you just set, not to other instruments that might have already been placed at the same place.
You can only set notes at those vertical lines. They represent chords. As soon as there’s at least one note in a chord, a green bar appears beneath it. This is the volume of the chord. You can adjust how loud the notes of this chord are by clicking and dragging this bar. You can’t choose different volumes for two notes on the same chord. Each chord will be at middle volume level when you create it.
You can erase notes with your right mouse button. It will erase the uppermost note at your current mouse position. You can also enable the eraser mode by clicking the Erase button below. When the eraser mode is enabled, your cursor will snap to nearby notes and mark them with a shadow. You can then erase them with the left mouse button. Mac users: The AMS does make a difference between Ctrl+click and right click. If you have a one-button mouse, you can only erase notes in the eraser mode.
Of course, your song isn’t limited to 4 measures. You can scroll through your song with the scrollbar at the very bottom of the main window. It covers the whole song. If you want to make your song longer, you can do that by moving to the end of the song and using the two buttons at the right side of the scrollbar. The single triangle appends 1 chord, the double triangle appends a whole window width of new chords.
Playback
Now you know the basics, let’s try and play a song. You can play a song by clicking the Play button below. While playing, use the Stop button to cancel playing. The song will start at the current position. If you want to play it from the beginning, you have to first move the scrollbar there. If you enable the Loop button, your song will start over after it hits the end. If Loop is disabled and the playback hits the end, the playback stops and the scrollbar is moved to the beginning of the song.
If you want to have your song played faster, click the Tempo field. A window will pop up and ask you for the speed you want the song to have. Enter a number and press Enter. The song speed is interpreted as beats per minute, which is equal to measures of 4/4 per minute.
Beyond the Basics
Let’s first have a look at song files. The AMS saves songs with the ending “.mss”, which stands for Mario Sequencer Song. It is also able to open files made with the Mario Paint Composer, use the menu entry Import MPC file… from the File menu for that. However, you cannot save songs in the MPC format. If you want to close the AMS and your current song is unsaved, it will ask you if you want to save it.
Now some more things on editing. Above the note system, there is some white space. You can place bookmarks there with the left mouse button. Those bookmarks will appear atop of the scrollbar at the bottom, you can use them as shortcuts to specific parts of the song. If you hold Ctrl or Shift while placing a bookmark, you’ll place a speedmark instead. Speedmarks have a speed value attached to them. When Mario passes the speedmark while playing the song, the speed will change to the value of the speedmark. You will be prompted for the speed when creating the speedmark. You can remove bookmarks and speedmarks with your right mouse button. Bookmarks and speedmarks will be invisible while playing the song.
If you want to adjust the speed for a lot of notes, there’s a neat hidden feature: Click and drag your mouse beneath the violin key and you’ll change the volume of all visible chords. Another little feature are the measure lengths: You can change them with the Measure buttons. It will allow you to adjust the number of chords in a measure. This will have no influence on the playback speed or anything else.
Now if you want to use other sounds for the instruments, you can do that by adding SoundFonts. SoundFonts are files that are a collection of sound samples used for midi instruments. There are quite some SoundFonts available for the AMS. They are usually designed for the Mario Paint Composer, but work without modification on the AMS. Look for SoundFont files at YouTube or the Mario Paint Hangout. When you have downloaded a file, choose the menu item Add SoundFont from the SoundFonts menu and select your file. You can delete the file afterwards, it will be copied to the AMS user data folder when you add it. After you’ve added a SoundFont, you can enable it in the SoundFonts menu.
Expert editing
You may have noticed that a note will always play as long as the sound sample is, or until another note of the same instrument is played. You have two possibilities to change this behaviour. The first one are mute notes. You can set them in the mute mode. To enable this mode, click the Mute button. A mute note is placed similar to a normal note, but will not make any noise. Instead, it will stop an instrument playing the note at the position where the mute note is placed. A mute note belongs to an instrument and thus will stop only a note of this instrument. You also have to get the sharp / flat modifier right. Mute notes particularly come in handy if you use soundfonts with long samples of if you want to have very short sounds.
The other way to influence note playback is to modify the behaviour of the instruments. Hold Shift and click on an instrument in the instrument bar. Its frame will change to green. Click another time to change it back to blue. A green framed instrument will not stop playing a note when another note of the same instrument is played. So the notes of this instrument only stop playing when the sound sample is over or a mute note is hit. This can be useful with piano or picked string instruments.
When you encounter a situation where you have a couple of SoundFonts loaded into AMS, and you want some instruments from this SoundFont and some others from that SoundFont, you can use the custom SoundFont editor. Choose the Custom menu item from the SoundFont menu. A new window will pop up. At the left, you have a list of the sounds currently assigned to the AMS instruments. Every entry contains the instrument sprite, followed by the name of the SoundFont used for that instrument and finally the name of the sample use from that SoundFont. On the top right, you have a dropdown menu with all available SoundFonts. Below is a list of the instruments included in the currently chosen SoundFont. To change the sound of an AMS instrument, choose the SoundFont you want a sound sample from, then click on the sample you want to use from that SoundFont and drag it onto the AMS instrument you want to use that sample with. When you’ve finished editing the instruments, click Done.
Finally, some more notes on the mss files: A file includes the name of the SoundFont used with the song. If you share your files with friends, they might not have this SoundFont installed. If the AMS can’t find a SoundFont with the name stored in the file, it will use the standard SoundFont. For the same reason, you can’t have multiple SoundFonts with the same name. Now if you’re a coder and you ever want to use the mss files for other things, you will find that they’re pretty easily readable. They’re formatted as XML, which makes them rather bloaty, but also quite easy to access. Please be aware however that if you make changes to the files with a text editor and you’re doing something wrong, you won’t be able to load the file into AMS again.